6.10 Markov Model Wizard
The Markov Model Wizard automatically creates Markov model structure of health states and the transitions among health states. This is a good first set of steps towards building your model, although the model generated will not be complete until you add model values/inputs.
To demonstrate the Wizard, we will use the same health states and transitions as in the completed example model Markov Cancer Final.trex.
The wizard will build the health states and transitions, but you would need to add event probabilities and values (likely cost, utility) for health states and perhaps for events. You also may need to add more complex patient pathways for each state within your model.
To start the Markov Model Wizard:
-
Choose File > New Markov Model Wizard from the menu.
The wizard will begin with default values, but you can and should change them as you proceed through the wizard.
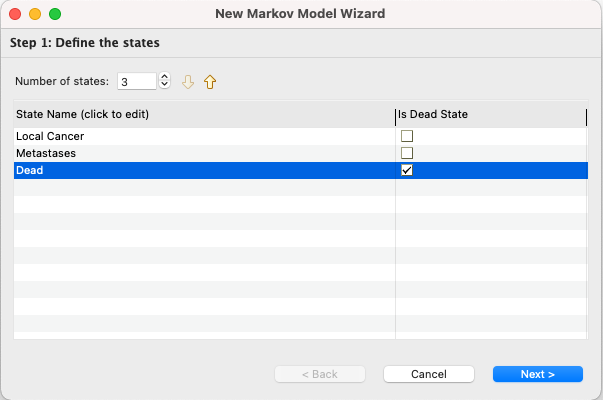
6.10.1 Define the health states:
-
Leave the number of states as 3.
-
Change the three state names to - Local Cancer, Metastases and Dead.
-
Note that the Dead state is already checked as a "Is Dead State".
-
Click Next.
In Step 2, the default transitions could be used, but we will make some changes here.
6.10.2 Define the transitions among health states:
-
Local Cancer state:
-
All three boxes should already be checked to facilitate transitions to all three states.
-
Change the labels:
-
To Local Cancer: set Transition Name to Stay here and leave the Short Name as #.
-
To Metastases: set Transition Name to Progress to Metastases and the Short Name to Progress.
-
To Dead: set Transition Name to Die and the Short Name to DieLocal.
-
-
-
Metastases state:
-
The bottom two boxes should be checked but not the first as no one will return to the Local Cancer state.
-
Change the labels:
-
To Metastases: set Transition Name to Survive and leave the Short Name as #.
-
To Dead: set Transition Name to Die and the Short Name to DieMets.
-
-
-
Click Next.
![]()
6.10.3 Set Markov Preferences:
-
Leave the HCC option as the default for this example, but you could choose the Within-Cycle Correction option as desired.
-
Set the Time Horizon to 30.
-
Click Next.
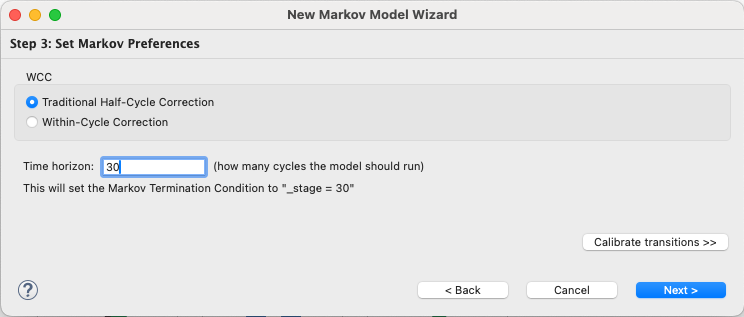
Note the button Calibrate transitions. We will proceed without calibration first by clicking Next. Later in this section, we will return to this point and use the calibration options.
6.10.4 Create the Model
The wizard now has all the information it needs to create your model structure. The next step is to create the model itself.
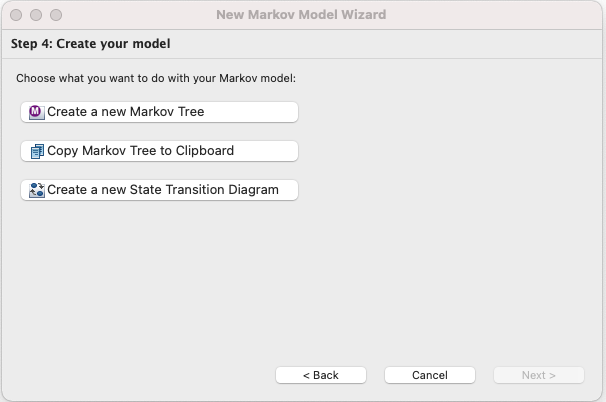
To create the model in several formats:
-
Click Create a new Markov Tree to create a new model document in the standard tree format.
-
Click Copy Markov Tree to Clipboard to copy the model tree format into the clipboard, so it can be pasted into an existing model.
-
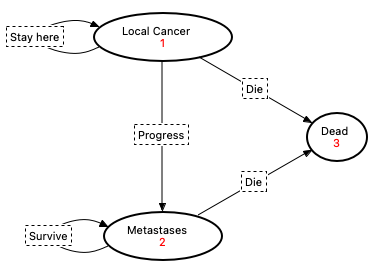
Click Create a new State Transition Diagram to create a new model document in the state transition diagram format.
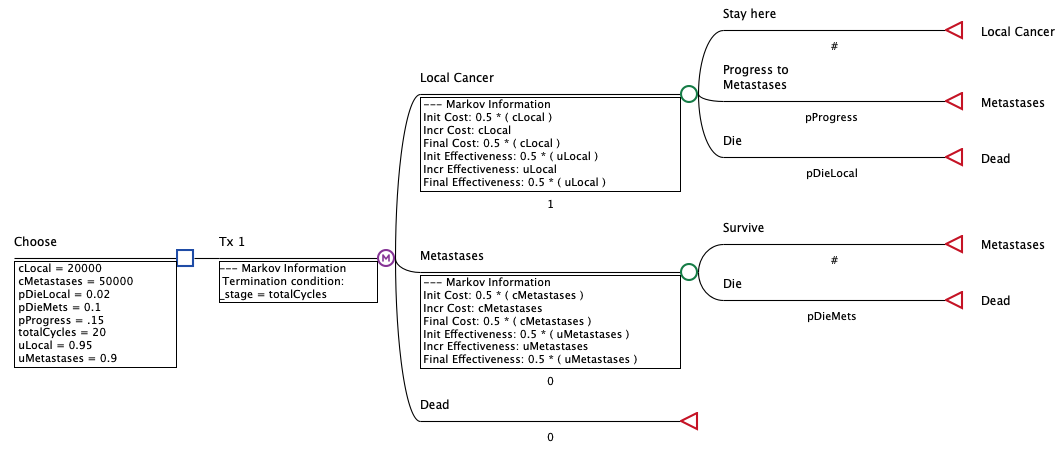
The first option generates the following tree.

The structure includes the health states and transitions defined in the wizard.
The clipboard option creates model structure identical to the above, but it could be pasted into an existing model, perhaps to add another strategy.
Note that no values are included in the model. You would need to add model inputs and references them in the model for initial probabilities, event probabilities and values at states and events as described earlier in this chapter.
Variables have been added for the three transition probabilities, but those variables are not yet defined.
The third model creation option creates the following State Transition Diagram.
The last button in Step 4 is Save current preset for future use. This option saves the entries for steps 1, 2 and 3 for possible use for a future model.
6.10.5 Markov Wizard Calibration
We will now repeat the wizard process using the calibration option at step 3. We will assume we went through all the earlier steps with the same entries, but now at step 3, we click the Calibrate transitions button.
After clicking the button, Step 4 expands for calibration. Note that if you choose not to calibrate the model, you can click the Don't calibrate transitions button.
Calibrate the Model:
-
Associate each Markov health state with a survival curve to match clinical data.
-
Local Cancer --> PFS
-
Metastases --> OS
-
Dead --> Dead
-
-
PFS table:
-
Click Browse and navigate to the Healthcare Example Models folder
(typically your home folder > treeage > workspace > Example Models > Healthcare. -
Choose the example model file MarkovCalibration_1a_Fixed_PreCal.trex.
-
Select the table Cet1_PFS.
-
-
PFS table:
-
Click Browse and choose the same model.
-
Select the table Cet2_OS.
-
-
Click the Calibrate parameters button.
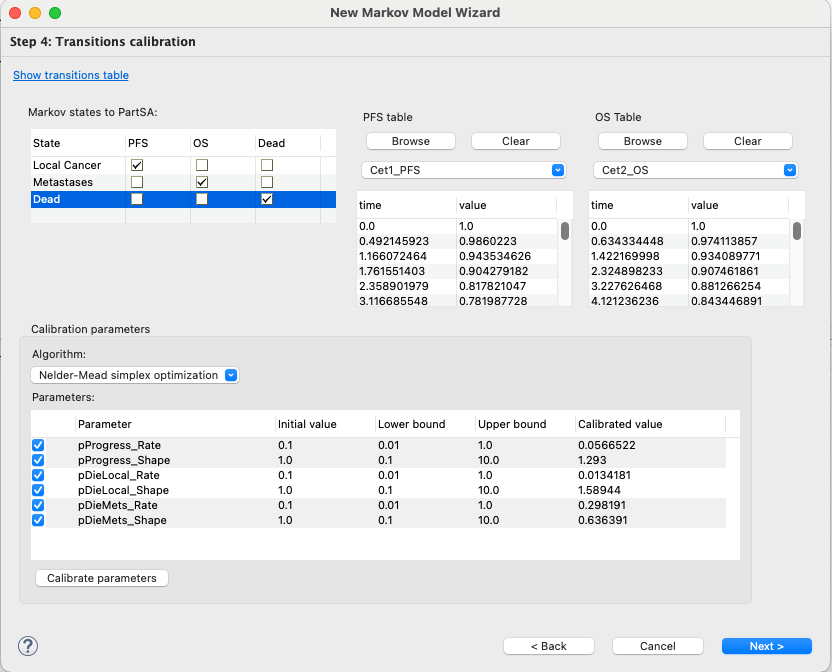
Note that the parameters that drive disease progression and death have been calibrated from Init values to Calibrated values.
Click Next to proceed to the step to create the model described earlier in this chapter.
Click Create a new Markov tree.
The new tree now had calibrated inputs for disease progression and death.
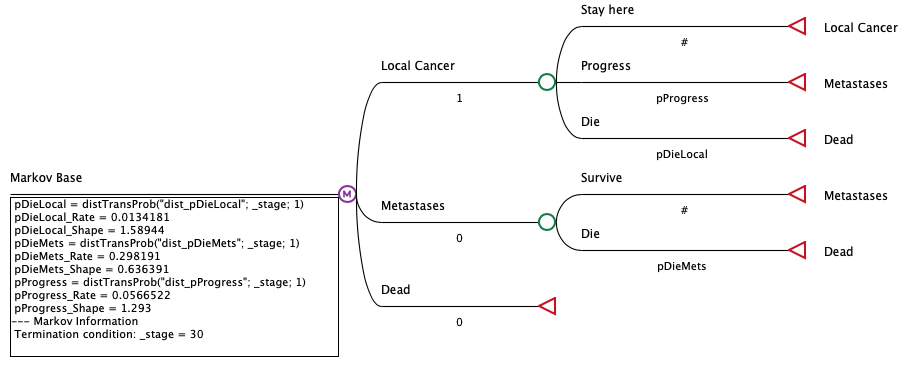
The model now includes 3 Weibull distributions to drive model progression. It also includes rate and shape input variables for each Weibull distribution and a variable that calculates the probability over time based on the Weibull distribution.
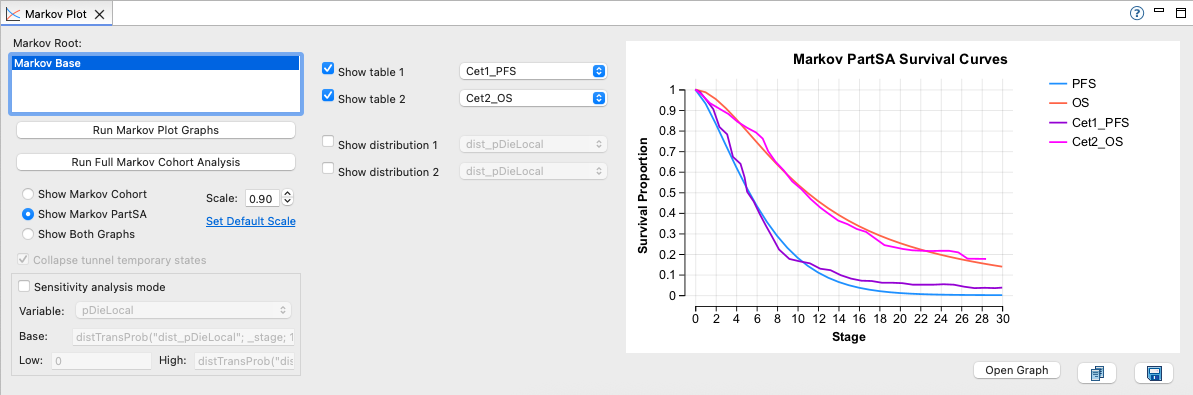
The wizard calibration process also defaults the Markov Plot to show the match between model disease progression and the source PFS and OS survival tables provided for the calibration.